Pardon my papercutting pun; I couldn't resist.
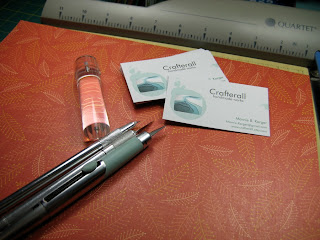
Recently, I had the pleasure of accepting a wholesale re-order from the delightful folks at Shoppe Local. I'm excited by how quickly the request came after the initial order, and by the fact that the shop itself seems to be doing well. The downside, if there is any, is that it's a lot of work to turn out a big batch of topographic pieces and card sets, especially when I try to make my turn around time as short as possible. Still, I do enjoy my work and I love the business, so no complaining from me! This time around, I thought I'd snap a quick before and after shot of my work. Here is the stack of colored cardstock, white cardstock, white pre-scored cards, and my two well-traveled tools for cutting and sticking:
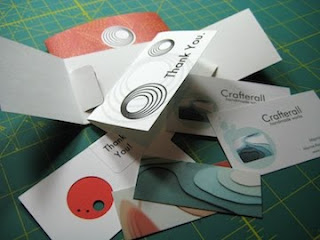
And here is the finished work, piled up once again on my studio table, this time as completed and packaged pieces ready to head to the shop:
I relish the satisfaction of completing a project like this. I'll admit that I do a little dance, raise my fists in the air, and make obnoxious crowd-cheer noises when I'm done. I figure I've earned it, right?
Wednesday, December 16, 2009
Monday, November 16, 2009
Making Lemonade, or in this case, Coupons
A while back, I ordered a batch of business cards. To my dismay, they arrived with all sorts of errors making them essentially unusable. But the cardstock was a very nice thickness and I felt like there must be something I could do with them. Ta-da! Coupons!
By covering up all the misprints and making them look more interesting, I transformed them into snazzy little coupon cards to include in orders from my shop. Here's how I make them:
I start by punching a one-inch hole on one side of the card. This isn't necessary to making them coupons, but it's an easy way to make them stand out.
And to show my true pack-rat/craftiness, I've been saving those little punched circles and piecing together a garland by gluing two together over a length of string. I couldn't possibly throw away perfectly good little circles! ;)
Next, I cut pieces of cardstock to fit just inside the length and width of the business card. This cardstock comes from the edges of the bigger sheets I use to make my cards and art -- yet another thing I save for just such a occasion. Using my handy-dandy adhesive dispenser, I get the punched card good and sticky.
Then, I center the cardstock over the business cards, and most of the letters and images are covered up!
Then, again because I like to be crafty, I punch the colored hole I've created once with a regular-sized hole punch, and twice with a small punch, so it looks basically like this:
Sort of lunar, don't you think?
Then I print out my text onto return address labels. One sheet gives me thirty stickers. When I created the labels on the computer, I rotated the text on one end to allow me to fold the label over the top edge of the coupon, like so:
A few minutes later, I have thirty cute, unique, and hopefully useful little coupons, and I've turned the lemons of my bum business cards into lemonade... or coupons... with a lemony zing, if you will. ;)
What do you think? Do any of you include coupons? How about other tricks for using misprinted or outdated business cards?
Thanks for taking a look. Happy crafting!
Wednesday, November 4, 2009
A Marvelous Little Mention
Well now, what do we have here?
Why, it's the vibrant, November issue of Mpls/St. Paul magazine. And how exciting that the cover invites readers to learn about local handmade goodies?! And here's the beginning of the feature:
And just a page or two away on page 63...
Why, there's a side panel singling out local artists who sell on Etsy!
And, wait! Did you see what you think you saw?
Indeed! There's my shop name! And a tidy little blurb about what I do. Woo Hoo! :)
Sorry for the cheesiness. I'm just excited about it. And there's even more news to come! Stay tuned...
Thanks to loosewirestudio for alerting me of this feature!
Coincidentally, my second purchase on Etsy was this lovely print from Studio Mela!
Wednesday, October 28, 2009
A, M, and AZING
My latest treasury features 16 amazing Etsy sellers who go way above and beyond the average listing photo and feature their items in print-worthy portraits. I've been collecting these over the last few weeks, and the selection was wonderfully abundant. These are off-beat, uneven, over-cropped, and downright inspiring. Enjoy!
Row 1: Yokoo, Meetalls, PunchDrunkPrincess, malam
Row 2: supplystar, moop, coughcoughchoke, fadedprairie
Row 3: ecologicalartist, 26olivestreet, lilfishstudios, rimadesigns
Row 4: CaptainCat, billyblue22, piprobins, doodlebirdie
Row 1: Yokoo, Meetalls, PunchDrunkPrincess, malam
Row 2: supplystar, moop, coughcoughchoke, fadedprairie
Row 3: ecologicalartist, 26olivestreet, lilfishstudios, rimadesigns
Row 4: CaptainCat, billyblue22, piprobins, doodlebirdie
Tuesday, October 20, 2009
A Tiny Stop-Motion Experiment
Along with about a ka-gillion other fun things, trying my hand at stop-motion animation has been on my list of crafty things to try for a long, long time. Recently, I've been nudged into giving it a go by the work of artist blu (check this out), and the intro credits to the awesome documentary Handmade Nation.
I knew I had to start small, so I just set up my little digital camera on a tiny tripod in my studio and made a few of my things "come alive." Following this tutorial, I used iPhoto to download the photos (all 56 of them) from the camera, then imported them into iMovie (the older and better version) where I strung them together and sped up the "slideshow" to create my first teeny tiny animated movie.
The quality is low, the sound is off, and it doesn't exactly tell a story, but it's a start, and it's got me eager to try something with more substance next time.
I'll sheepishly admit that that's me doing the lame "beat boxing" in the background. It's hard to find a decent little sound effect that covers a mere 5 seconds of video, so I recorded one myself.
I should also note that the three stylin' little mini moo business cards are from my dear friend, Kendra Zvonik. Do sneak a peek at more of her expressive art here.
So what do you think? Too short to tell? Have any of you tried this? Any ideas for the next one? Anyone think I have a chance to make a record deal out of my mad mouth skills? kidding.
Wednesday, October 7, 2009
Business Card Holder - a simple, little tutorial
As a seller, I know that it's important to place a few business cards with every order from my shop. As a buyer, I love getting fun packages and neat little extras. Marrying these two ideas, I've come up with a simple business card holder that doubles as a sort of goodie bag for my lucky and lovely patrons. And here, for your crafting delight, is a tutorial to make your very own business card holders.
Tools and Materials:
- Cardstock or thin paperboard (I'm using a 12 x 12" scrapbook-type cardstock. Try cereal box paperboard or an oversized postcard)
- Ruler
- Paper Cutter(s) (I'm using my big paper slicer for the straight cuts and a small swivel blade for cutting the notch)
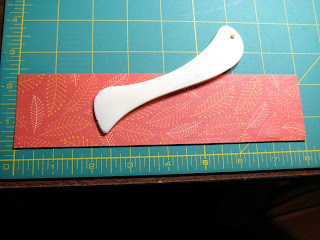
- Scoring tool (I use a scoring blade on a paper trimmer. A bone folder can work as well)
- Some sort of adhesive to hold the holder closed (I use a sticker. Try ribbon, decorative tape, glue dots, double-sided tape, etc.)
Instructions:
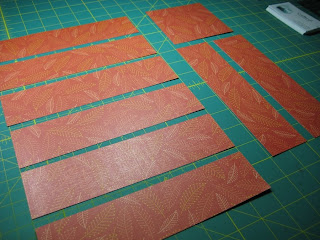
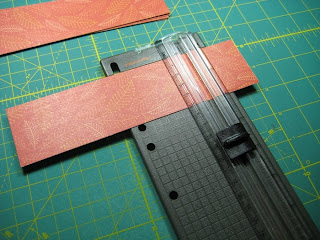
Step 1: Cut the cardsctock into 2" x 8" strips. A 12 x 12" piece yields 8 strips and a 4" square.
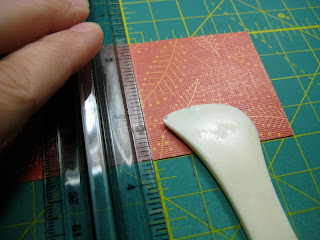
Step 2: Mark scoring points at 2.25" and 6" along a single strip.
Step 3: Score the cardstock on these two points across the strip.
Again, a bone folder and a ruler work fine here too. If you lack a bone folder, a lead-less mechanical pencil can do in a pinch.
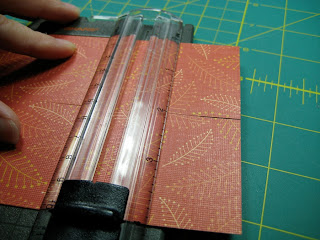
Score any remaining strips you cut along the same points. I usually use the first strip as a guide to cutting the rest by leaving it in the trimmer and laying the next strip beneath it.
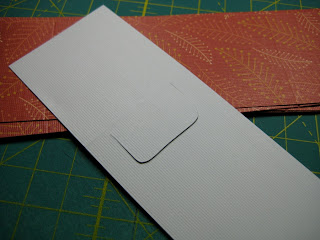
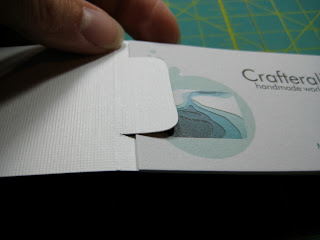
Step 4: Cut the notch. This notch is what holds the business cards more or less in place. Star just below the 2" score line, pull down about half and inch, go over about an inch, and then finish lust below the score line again to look like this:
Then, fit in your cards by slipping 3 or 4 of them under this notch.
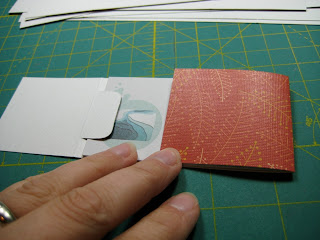
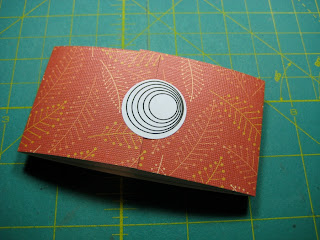
Step 5: Fold sides to close and seal.
Ta-da!
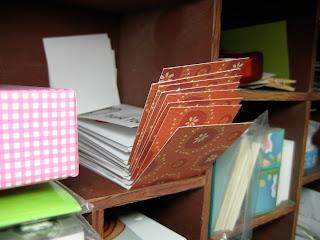
I really put mine to task, filling each one with a folded thank you note, two regular sized business cards, two mini Moo cards, and a coupon made from an old business card (I'll show you how I make those another time).
I like to keep a stack of these handy so that when I get an order, all I have to do is write a personal note in the thank-you card, put it all back together, seal it up, and nestle it in the package.
You could certainly dress these up more to your taste, adding ribbon, making them bigger, rounding the corners, etc. Me? I like 'em simple. Do let me know if you try these out. Happy crafting!
Thursday, September 24, 2009
Take Two!
My second Uptown Market event (the final U.M. of the year), was even better than the first. The weather was absolutely gorgeous: no threat of rain, a light breeze, and a temp in the mid-seventies... Ahhhhh. The turn out was a little better, my display was more catchy, and my neighbors were awesome.
I put one table all the way to the front of the booth and squeezed in most of the topo pieces there. I staggered the second table a few feet back and placed the flower pieces and the 8 x 10" works on it. Only a few people ventured all the way back to the second table and it definitely helped when I invited people there or pointed it out.
One of my favorite parts of the day was watching people do double-takes when they passed my booth. They'd be cruising along, glance over at my display, look ahead again, then quickly turn back, stop in their tracks, and make a line for the table. Sweet! I'm sure some of them were just curious about what all those "colorful blobs" were, but some asked great questions, spent a few minutes browsing, and a few even bought something for themselves.
The best seller, hands-down, was the Chain of Lakes pieces. Local folks shopped locally and liked the piece that represented so much of what makes their neighborhood beautiful. Because of those pieces, I also received many inquiries about custom work of other lakes and areas.
To my left was the painter, Patrick Ginter and his colorful, eye-catching works. The only thing more colorful than his paintings was his personality and sense of humor. I enjoyed our little chats and random musings throughout the day.
On my right was a talented team of cousins who put together a sell-out spread of organic goodies made from local fruits and veggies. Mary Ann Knox, a bit of a local celebrity and compost queen, along with her cousin Linda were experts at luring folks in with delicious-looking treats and handling the entire event with professionalism and bright attitudes. I bought one of their outstanding pecan pies before they were gone. Divine!
A little further down the street, a sweet-smelling bath and body vendor had the genius idea to do a little sidewalk chalk promotion. I complimented their idea and they were kind enough to let me wear down a couple of their sticks for my own little walk-over ad. I'm not sure a ton of people noticed it, but it was a fun experiment.
I also met the delightful Miss Laura Brown who made a special point to find me, introduce herself, and declare her intent to be my friend. How could I resist? :) Later in the day, she ambushed my booth and dropped off an adorable, felt, mini-pennant banner that I immediately strung up on my front table. Super cute. Laura has a sweet little shop on Etsy too!
As usual, there were a few musicians busking here and there. Two spots down from me, a couple of dudes struck up a few tunes playing Avett Brothers songs and a few others. It made for a nice mood and some sing-along moments. Here's a little clip and a short panorama:
Before, during and after the market, I was MUCH less keyed up than I was for the first one. I knew pretty much everything I needed to know and felt confident about what I was doing. Matthew helped me set up and take down, and then spent most of the day with the girls. My mother-in-law stopped by for a while and brought my Leah Bear with her for a nice visit.
In all, the Uptown Market was an enjoyable opportunity for me to be introduced to the world of craft fairs. I felt successful and inspired. Boo-ya!
Thursday, September 17, 2009
Custom Work
I know, I know, I really should be working on building up my inventory for the final Uptown Market this Sunday. Or, I should be adding new pieces to my dwindling stock in my shop. Or, I should be making prototypes of season-based pieces from the sketches I've drawn. But, I've been having way too much fun working on some very cool custom pieces.
The first one is a "downward" topography of Joshua Tree National Park in California. It is to be a wedding gift from the bride to her groom. I think this piece ended up with a perfect blend of accuracy and abstraction.
The next custom request was a fun and challenging project that involved incorporating maps from various games into five separate yet similar 12 x 12", topographic pieces. I've never before used anything other than my own stash of cardstock, so working with/around/through the maps sent to me was a go at something new.
I also made a custom collection of topographic card sets in the shape and depths of my hometown lake, Lake Bemidji, in northern Minnesota. They turned out really well, and I was so excited to send them off that I forgot to take pictures of them. Ah well.
When starting a custom project, I really try to make sure I understand what the project means to the buyer and I try to get a clear description from them as to what they're expecting the piece to be. When the piece is complete, I still hold my breath a little each time I notify the buyer, hoping that what I've created is close to if not even better than what he or she had in mind. And when I get glowing feedback from the patron when all is said and done, then I feel awesome about the whole thing!
I keep a small blackboard in my studio. This is where I write my custom orders, what they are, and when I promised them to be complete. Currently, it's a blank slate. And even though I have so many things I should be doing as I mentioned earlier, I get a strong urge to ask the world, "What's next? Whatchya got for me?"
Monday, August 17, 2009
Uptown Market - August 16th
Wooo Hooooo! We did it!
It feels incredibly good to have my first craft fair over and done. It was a great experience and, like most newbies, I learned a lot, thankfully with few regrets. The weather ignored all the prognostications for heavy rain, and gave us pocketed sunshine throughout most of the day with only about five minutes of a very light sprinkle mid-day. Every minute that it didn't rain, my smile got bigger and my shoulders relaxed more.
The event was well run and we found our little corner of the market easily. The boundaries of our booth were chalked on the road and we could pull our vehicle right up to it on the other side of the street - how sweet! This made unloading a breeze. We unpacked all the gear and got to work on the tent. I was shaky-nervous and excited. Here's me working on a corner of the tent -- you can see how conveniently close the van was to this.
Once the tent was up, we moved on to the tables, the hanging wall doo-dads, and generally getting things up and show-ready. In this pic, you can see some of my essentials: coffee, duct tape, plastic totes, snacks, band-aids, and everything else.
The overall turn-out was fairly slim and not nearly the hordes of people I had seen in flickr pages for other fairs, but it was steady and polite. I gave away quite a few business cards and had many people stop in, ask questions, get closer looks, and offer compliments.
I felt prepared for questions about how I make my things, if I could do custom work, and how long I'd been doing this, but a couple of questions caught me off guard. The very first visitor to my booth asked, "What are these?" Ummm... Isn't it obvious? :) I resisted saying that and realized more throughout the day that it wasn't crystal clear that I was selling art and cards made from layered, colored paper. One person thought the Topo pieces looked like Rorschach ink blots, while another thought on first glance that they were watercolors. Another passerby simply asked, "What's Crafterall?" To which I answered, "That's me! And all the work do here."
A woman on one side of me sold magnetic jewelry, and the woman on the other side of me sold quilted bags specifically made for four-legged walkers. Other vendors sold fresh, organic produce, screen prints, t-shirts, pottery, fresh-brewed coffee, bath and body products, photo prints, metal ornaments, and some of the tastiest looking pulled meat sandwiches that kept walking by in the hands of happy customers. There were also half a dozen street buskers including a guy on an apartment balcony throwin' out some def turntable spins. Along with a handful of non-profit organizations advertising their causes, the Uptown Market was an eclectic melange of things to see, touch, hear, and eat. Pretty darn cool.
There were so many highlights to my first craft fair. The weather, which became my biggest worry in the last few days before the show, was wonderfully mild. It was a little breezy, but everything in my booth stood its ground. My very first sale of the day could not have been better. The buyer was local, loved the "Chain o' Lakes" pieces I made, snapped one up for herself, and appreciated being able to pay with her credit card. She was enthusiastic and complimentary about everything in my booth -- such a redemptive and encouraging boost for me! I heard lots of other nice compliments throughout the day, and even had a patron say that she had seen my work on Etsy! Awesomeness! She picked up a "Retro Poppies" for herself too. A couple of folks talked with me about potential custom work, and I received confirmation this morning for one such request.
The biggest highlight of the entire process, hands down, was having the tireless and and cheerful assistance of my hubby with me through it all. His MacGyver-like knot-tying and problem-solving/preventing efforts were invaluable and helped to make me a much cooler cookie than I would have been without his help. We were able to chat about what seemed to be working this time, and what we could do differently next time. He also managed the booth while I perused the other booths, and he bought me a yummy lunch from a nearby African restaurant. Thanks, honey!
At the end of the day, my earnings were nothing to sing about, but I covered the cost of my booth fee and enough after that to make me eager to do this again in September. Yee-haw!
Saturday, August 15, 2009
Basement Booth!
O.K., so here it is!
Leah, my number one fan, is modeling it, and hanging off the chair she's in is the apron I made for the event. Of course, there will be a canopy over the top and we'll most likely have the sides up with the 70% chance of rain (and thunderstorms - shhhhhh) prediction. I'm also going to hang a big, framed "Retro Poppies" papercut as well as a smaller, framed Topo piece for a little more vertical interest. But basically, this is how I think it will look. The Crafterall banner will be on the front of the tent once I figure out how to do so, and I'm still not sure where that little plant stand table will go.
Here is the table with the topography and art card pieces. There's a basket of one-of-a-kind items, and tiered displays of various cards that I will re-load as necessary. On the little easel, there's a single open card for some tactile interaction. At the recommendation of the some wonderful Etsy folks, this guy is out for folks to touch, open, and drool over. ;)
This is the "flower" side of things. I found the white memo-station thing for a quarter at a garage sale and re-fitted a ribbon board in the flat space. Got lucky with the three front pockets as they are the perfect size for the cards!
As an Uptown Market Exclusive, I'll be selling papercut topographies of the popular Minneapolis Chain of Lakes (Twin Lakes, Brownie Lake, Cedar Lake, Lake of the Isles, Lake Calhoun, unnamed swampy area, and Lake Harriet). I hope these will be a hit with the local crowd.
Behind the scenes, I've got my credit card imprinter with slips, a hole-y box (50 cents in the IKEA as is section) for pens, and plastic bags for purchases. I've got a load of business cards, logo-rific postcards, and hard candy to hand out too.
I'm still undecided about using the kraft paper over the white tablecloth. I like that it sets off the white of the cards, but worry that it cheapens the look, and I'm not sure it will hold up in the forecasted precipitation. What do you think?
The reality is solidifying and I have my booth number assigned! I'll be representin' in booth #45, just west of Bryant Avenue. If you're in the neighborhood, please stop by for a hug!
Wednesday, August 12, 2009
Inspired
...and tired! Once again I have stayed up way too late working on other things (see previous post) and managed to catch a treasury opening. Here's the latest, inspired by one of Kendra's amazing new paintings. I love the colors, the forms, and the overall energy of the piece. It makes me happy. Enjoy!
Tuesday, August 4, 2009
12 days and counting...
I'm almost completely consumed with preparations for the upcoming Uptown Market in 12 days. This will be my first craft fair as a vendor. I've been to them before as a buyer and to take notes, but I've never been on that side of the table.
I'm excited, nervous, overwhelmed, and only freaking out a little bit. I'm spending as much as my non-kid time down in studio working on building an impressive stock of work. To give my wrist a break from all the cutting, I'm putting together all the not-so-little details such as obtaining a canopy (thanks, bro!), buying a credit card impression doo-dad, figuring out prices and how tax will factor into them, booth decorations and logistics, and making sure I have enough of the typical craft fair necessities on hand for the big day.
The Etsy fora has proven to be a wealth of craft fair advice as well as many good friends and relatives who have had experience hawking their wares at events like this. I know this is only my first show and I will learn so much from the opportunity. I just want to do as much as I can right the first time to earn as much success as possible. One of the things I've learned already is that by writing about my experiences helps me to sort through the clutter in my head and de-stress a bit. So, stay tuned as I hope to plug in here at least once again before the fair with an update and hopefully pics of what I'm up to. Please feel free to offer any further tips and tricks or links to such things in the comments. I'm all ears.
Subscribe to:
Posts (Atom)